You have just unboxed your shiny new subwoofer, placed it in your listening room, and walked behind your hi-fi system only to experience a sudden moment of panic. You are holding a cable in your hand, looking at the back of your traditional stereo integrated amplifier, and realising there is no dedicated port labelled "Sub Out" or "LFE".
Don't pack the subwoofer back into its box just yet.
While home theatre AV receivers have standardised a single RCA "LFE" (Low-Frequency Effects) output, traditional stereo amplifiers built for pure music playback often do not. Fortunately, connecting a subwoofer to a stereo amplifier is entirely achievable, and doing it without an LFE channel can actually result in a vastly superior, tighter, and more musical bass performance.
Whether you are a first-time stereo owner standing in front of your gear right now, an audio enthusiast integrating a high-end REL subwoofer, or a frustrated troubleshooter wondering why your bass isn't humming along smoothly, this definitive guide will get your hi-fi system singing.
The Golden Rule: Active vs Passive Subwoofers
Before plugging anything in, we must establish what kind of gear you are working with.
-
Active Subwoofers (Powered): These have a built-in internal power amplifier and require their own power cable plugged into the wall. 99% of premium active subwoofers sold for hi-fi use today are active. This guide focuses exclusively on active subwoofers.
-
Passive Subwoofers (Unpowered): These do not plug into a wall outlet and require power from an external amplifier. These are rare in modern stereo hi-fi setups and generally found in custom, passive home theatre installations.
Because your active subwoofer has its own amplifier built-in, any signal sent from your stereo amplifier is strictly for data, it is just an audio blueprint telling the subwoofer when and how loudly to flex its cone.
Connection Method 1: The High-Level Connection (Best for Music & Systems with No Sub Out)
If your stereo amplifier does not have a dedicated subwoofer output or a "Pre-Out" section, this is your go-to method. Known as a High-Level or Speaker-Level connection, this approach actually sends the exact same high-voltage signal running to your left and right speakers directly to your subwoofer.
Important Safety Note: A common myth is that high-level connections overload your amplifier. This is false. The high-level input on an active subwoofer has an incredibly high impedance (typically 100,000 ohms or higher). To your amplifier, the subwoofer is practically invisible. It draws essentially zero power from the amp; it merely "reads" the musical signal.
The Standard Speaker Wire Method
If your subwoofer has red and black speaker binding posts on the back alongside your normal speakers:
-
Run a standard pair of speaker cables from your amplifier’s Left (+) and (-) terminals directly to the subwoofer’s Left High-Level (+) and (-) inputs.
-
Run a second pair of speaker cables from your amplifier's Right (+) and (-) terminals directly to the subwoofer's Right High-Level (+) and (-) inputs.
-
Your main left and right stereo speakers remain connected to those exact same amplifier terminals alongside the sub wires.
The REL Way: The Neutrik Speakon Connection
If you bought a REL subwoofer, you will notice a unique, professional round input terminal called a Neutrik Speakon. REL strongly advocates for high-level connections because it ensures the subwoofer receives the exact same tonal characteristics, timing, and structural damping factor as your main speakers, creating a seamless blend.
Your REL comes with a specialised 10-metre cable featuring a Speakon plug on one end and three bare wires (Red, Yellow, and Black) on the other. Here is exactly how to hook it up to a standard stereo amplifier:
-
Red Wire: Twist this together with your main speaker cable and insert it into the Positive (+) Left terminal on your amplifier.
-
Yellow Wire: Twist this together with your main speaker cable and insert it into the Positive (+) Right terminal on your amplifier.
-
Black Wire (Ground): For standard Class A/B amplifiers, connect this to the Negative (-) speaker terminal of either the Left or Right channel.
⚠️ CRITICAL WARNING FOR BALANCED / CLASS-D AMPLIFIERS: If your stereo amplifier uses a Class-D design, or is a fully balanced/bridged design (common in brands like NAD, Primare, or Cambridge Audio), never connect the black wire to a negative speaker terminal. Doing so can short-circuit and severely damage your amplifier. Instead, attach the black wire to a metal chassis ground screw on the back of the amplifier, or leave it completely disconnected and safely taped off. If you are unsure about your amplifier's internal design, contact the Eastwood Hi-Fi team before connecting.
-
Plug the round Speakon connector into the back of your REL subwoofer and twist it clockwise until it clicks into place securely.
Connection Method 2: The Pre-Out Connection (Low-Level RCA)
Many modern stereo amplifiers feature an RCA section on the back labelled PRE-OUT (Left and Right). This section provides a variable volume signal controlled directly by your amplifier’s main volume knob.
-
Take a standard stereo RCA cable (the classic Red and White dual cables).
-
Connect the Left and Right Pre-Out on your amplifier to the Left and Right Low-Level Line-In ports on the back of your subwoofer.
-
If your subwoofer only has a single RCA input labelled LFE/Mono, connect a single RCA cable from just the Left (Mono) Pre-Out of your amplifier to that input.
Note: Avoid using a standard hardware Y-adapter to smash a Left and Right Pre-Out signal together into a single LFE jack. Doing this can cross-talk at the amplifier stage, collapsing your main speakers' stereo imaging into mono.
Connection Method 3: Dedicated Sub Out (The Simplest Route)
If you are lucky enough to have an integrated amplifier with a dedicated single RCA port explicitly labelled SUB OUT, your installation is remarkably straightforward.
-
Take a single, shielded RCA Subwoofer Cable.
-
Connect one end to the SUB OUT port on the back of your amplifier.
-
Connect the other end to the LFE (Low-Frequency Effects) input on your subwoofer. If your subwoofer does not have a dedicated LFE port, simply plug it into the White (Left/Mono) RCA input.
Dialling It In: Subwoofer Crossover & Setup Settings
Once your physical cables are hooked up, turning everything on is only half the battle. To make your subwoofer sound like an extension of your main speakers—rather than an intrusive, booming distraction—you must tune the controls on the back panel.
1. Subwoofer Crossover Settings
The crossover knob determines the exact frequency where your main speakers stop playing deep bass and your subwoofer takes over.
-
The Golden Rule: Look up the frequency response specifications of your bookshelf or floor-standing speakers. Find their lower limit (e.g., if your speakers go down to 50Hz).
-
The Setting: Set your subwoofer crossover knob roughly 10Hz above your speakers' lowest rating. For a 50Hz speaker, start your crossover dial at approximately 60Hz. You want the subwoofer to gently blend in just as your main speakers begin to roll off naturally.
2. Volume / Gain
Start with your subwoofer volume completely down. Play a piece of acoustic music you know intimately featuring a prominent acoustic bass line or kick drum. Slowly turn the subwoofer volume up until you can just feel the weight of the low notes.
-
The Trick: A perfectly dialled-in subwoofer shouldn't call attention to itself. If you can actively point to the corner of the room and say, "The bass is coming from right there," the volume is too high. You should only notice the subwoofer when you turn it completely off and the soundstage collapses.
3. Phase Control (0° to 180°)
Because your subwoofer is sitting at a different distance from your ears than your main speakers, the soundwaves can sometimes arrive out of sync, cancelling each other out.
-
Sit in your primary listening position while a friend flips the phase switch between 0° and 180°.
-
Leave the switch on whichever setting yields the loudest, tightest, and most cohesive bass. If they sound identical, leave it at 0°.
Troubleshooting: Why Is My Subwoofer Not Working?
If you have completed the connections but find yourself met with total silence or an unpleasant hum, run through this quick checklist:
-
Check the Power Mode: Many subwoofers have a switch for "On / Auto / Off". In "Auto" mode, the sub needs a reasonably strong signal to wake up. Turn the switch to a permanent "On" position to test if it is receiving a signal first.
-
The Tape Output Mistake: If you connected your subwoofer via RCA to a port labelled "Tape Out" or "Rec Out", your subwoofer volume will not change when you turn up your amplifier. These outputs are fixed-level. You must use a port labelled Pre-Out or Sub Out.
-
Unwanted Loud Hum: If your subwoofer emits a loud, low-frequency buzz even when no music is playing, you likely have a ground loop or an unshielded RCA cable running too close to main power cables. Try routing your audio cables away from power bricks, or ensure your subwoofer and amplifier are plugged into the same power board.
Frequently Asked Questions
What cables do I need to connect a subwoofer to a soundbar?
Most modern soundbars that support an external subwoofer use an automatic wireless connection. However, if your soundbar features a physical output for an external subwoofer, it will almost always be a 3.5mm mini-jack or a single RCA output. You will need a 3.5mm-to-RCA mono cable or a standard RCA subwoofer cable to bridge the soundbar's output to the subwoofer's line input.
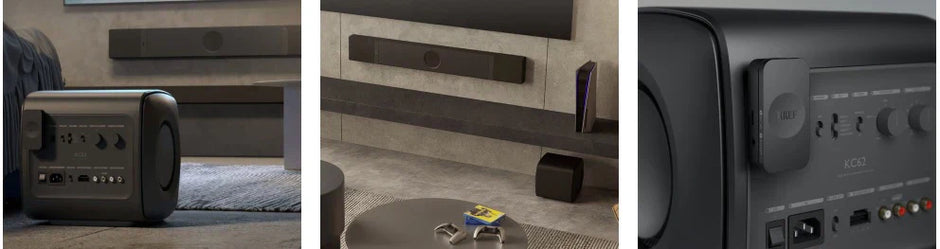
Can I connect a subwoofer wirelessly to my existing audio setup?
Yes. If running physical cables across your living room or rug is impossible, you can use a wireless subwoofer transmitter and receiver kit (such as the REL Arrow or SVS SoundPath systems). The transmitter plugs directly into your amplifier's Pre-Out or Sub Out, while the receiver plugs straight into the subwoofer's RCA inputs, delivering uncompressed audio without the cables.
Ready to Elevate Your Listening Experience?
Integrating a subwoofer into a high-fidelity stereo system transforms your music, unlocking a sense of scale, atmosphere, and deep emotional impact that even large floor-standing speakers struggle to replicate on their own.
If you are still staring at the back of your amplifier trying to figure out the cleanest connection path, or if you are looking to choose the perfect subwoofer to complement your current stereo speakers, don't guess. The expert team at Eastwood Hi-Fi has spent decades designing, configuring, and optimising premium stereo setups for music lovers across Australia.
Contact us for tailored, expert advice, or explore our curated selection of industry-leading subwoofers online to find the missing piece of your audio puzzle.